Basics of page layout with CSS
In this tutorial, Elaine shows you the basics of laying out a tableless page in Cascading Style Sheets. (Editors note: This tutorial page is an example of a CSS layout with no tables)
INGREDIENTS
Elaine (rAyVoLvEz)
- CSS
- Styles
- Containers
- Divs
-
- Difficulty 8/10
© By Elaine (rAyVoLvEz)::
Edited By
Colin Smith www.photoshopcafe.com
The Concept of Design Independence
Before we jump into the process of designing websites, we have to first understand a concept which I call Design  Independence. If you want to change or add graphical elements to your site design, you don't want to re-code, re-build or re-slice the site every time to keep the freshness or just to make a graphical change. Do more with less.
With CSS, the idea of Design Independence will be possible and achieve-able. So now, let us begin with no further ado.
CSS Layout = Layers Order Concept
For those familiar with Photoshop, the idea of Layers is definitely something that you are very familiar with. What is on top is on top, what is below is below. So in this case, simply put, the basic web design structure at the very bottom, the navigation at the very top, and contents will be on top of structure too. (Editors Note: This is called Z-stacking)
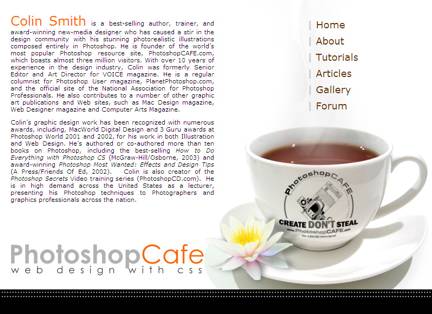
Check out the final example CSS Tutorial Site Sample: Of which the text link will be on top of the coffee, which will be added as CSS layers in Dreamweaver instead of image links.
1a
How do we then prepare the images?
We will need the background to be fairly fluid, meaning it should span across the screen with the black bar. (Eds note: You can make this a thin vertical image and repeat it to cut down on file size)
When we prepare our design, we can split it into the basic 3 components, the “fluid” background, the “fixed” designs and the “navigation”(if you are using image links). I would usually prefer text links as they are better for SEO (Search Engine Optimization).
- Background image

1b

- The design image
1c
 The Logo Text
2
 Now lets move on to Dreamweaver. Launch Dreamweaver, define a site and begin the process. (Defining a site - this old but the principles are the same)
3
File > New > Basic Page > CSS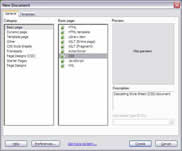
Save and name it main.css and save this CSS File in the “css” folder. Images will go in “images” folder.
Type this to your CSS Document (You are creating your body style):
body{
background: url(../images/background.jpg) repeat-x #000000;
margin: 0px;
colour: #000000;
font-family: Verdana, Arial, Helvetica, sans-serif; /*or any other font family you prefer*/
font-size: 12px;
}
4
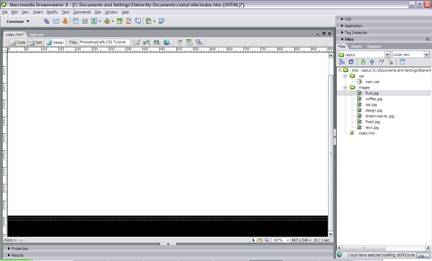 Now you can start your html file, name it index.htm if it’s the homepage. To attach the stylesheet to your document type this in code view inside the the head tag:
<link rel="stylesheet" href="css/main.css" type="text/css" />
Now if you go to the design tab, you will see the background of your site.
5
Now we will create a container that will centralize our site across our resolutions. The following code is brought to you by Philip J Neal. Create a container with the maximum fixed width of your site, in this case, it is 800px
Back to your CSS file
#container {
position: relative;
width: 800px;
margin: auto;
}
In HTML File
Add this tag in the <body> section
<div id="container"></div>
All your contents will go in the “container” <div> so it will centralize. (eds note: The div acts as a wrapper that allows us to place contents anywhere on the page, in a way the div does what tables do)
6
CSS file
div.imageholder{ /*This will be the holder which will hold our page image(i.e. coffee.jpg) */
position:absolute;
width:424px; /*Width of Image*/
height:544px; /*Height of Image*/
left:376px; /* This is applied relative to edge of container */
top:0px;
}
HTML File
We will add this “fixed” div into the “container”
<div id="container"><div class="imageholder"> <img src="images/coffee.jpg" alt="Coffee" /></div></div>
 And this is what you will get:
Screen after Coffee Addition Image,
7
Now we will create another div to hold the logo/text :
CSS File
div.logotext{
position:absolute;
width:376px;
height:90px;
left:0px;
top: 453px;
}
HTML File
Add the following in the container as well.
<div class="logotext"><img src="images/text.jpg" alt="PhotoshopCafe CSS Tutorial" /></div>
8
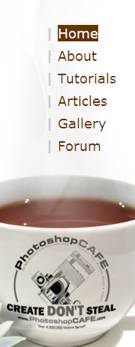 Now time for the navigation.
Creative a div to hold the text links
CSS File
div.navigation{
position:absolute;
width: 108px;
height: 153px;
left : 565px;
top: 39px;
z-index: 5; /*z-index is the ordering of the CSS Layers, the bigger the z-index, the higher the more on top it will be, I set a z-index of 5 so the navigation will remain on top at all time*/
line-height:30px;
font-size: 18px;
color:#663300;
}
HTML Page
<div class="navigation">Home <br />About<br />Tutorials<br />Articles<br />Gallery<br />Forum<br /></div>
Now we will do some little formatting and add the silver line.
<div class="navigation">| Home <br />| About<br />| Tutorials<br />| Articles<br />| Gallery<br />| Forum<br /></div>
9
CSS File
.style1 {
color: #CCCCCC;
font-weight: bold;
}
Now we will code the navigation styles :
a.navigation:link {
color: #663300;
text-decoration: none;
}
a.navigation:visited {
text-decoration: none;
color: #663300;
}
a.navigation:hover {
text-decoration: none;
color: #FFFFFF;
background: #663300;
}
a.navigation:active {
text-decoration: none;
color: #663300;
}
10
HTML File
We will edit our navigation div
<div class="navigation"><span class="style1">|</span> <a class="navigation" href="#">Home</a> <br />
<span class="style1">|</span> <a class="navigation" href="#">About</a> <br />
<span class="style1">|</span> <a class="navigation" href="#">Tutorials</a><br />
<span class="style1">|</span> <a class="navigation" href="#">Articles</a> <br />
<span class="style1">|</span> <a class="navigation" href="#">Gallery</a> <br />
<span class="style1">|</span> <a class="navigation" href="#">Forum</a></div>
</div>
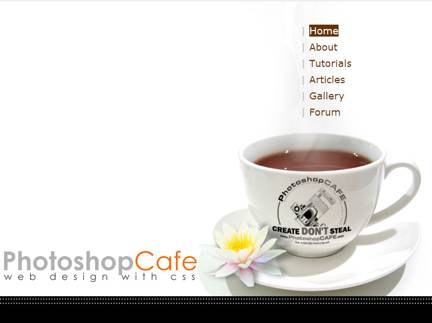 Ta-da and you are done with the navigation There are many options to play with when you are styling the navigation, like border-style, font-colour, background, font-style etc.. Unlimited possibilities there!
11
A site with no content is a empty shell, so now we will add a div to hold our contents.
CSS File
div.contentarea {
position:absolute;
width: 376px;
height: 300px;
left: 17px;
top: 21px;
font:11px;
text-align:justify;
}
HTML File
<div class="contentarea">
<p><span class="style4">text here</span> type in all your body txt here.</p>
</div>
And a local style to highlight the first word :
<style type="text/css">
.style4 {
font-size: 24px;
color: #FF6600;
}
</style>
 The local style is local to the index.htm, and may not be global through the other parts of the site.
You can add image to the content area as you wish too.
This is what we have now: CSS Tutorial Site Sample:
I hope this CSS Tutorial is helpful to your learning. Till then.